Feeds:
Posts
Comments

Archive for the ‘Indian Recipes’ Category

Excellent as an after school snack or after a long day, this  basically Indian recipe, is mild, very gently spiced and can be enjoyed by people of all tastes. Great in nutrition and taste, this healthy snack is so easy to make.

Try!


hearty quinoa snack

Ingredients

1 cup quinoa grain

1/3 cup roasted and lightly salted sunflower kernels (seeds from which the husk or outer covering has been removed)

1medium potato, boiled and cubed.

2 level tablespoons liquid ghee (clarified butter) plus one extra teaspoon, to add to quinoa while cooking.

1 teaspoon cumin seeds (jeera)

1/4 teaspoon finely cut green chili or to taste. (Use a mild variety or seranno peppers if you like it pungent)

1 teaspoon lime juice.

1 teaspoon sugar.

Salt to taste.

1/4 cup finely cut fresh cilantro leaves and 2 Tablespoons shredded fresh coconut for garnish. (optional)

Method

In a medium saucepan, heat two cups water.  Add  one teaspoon ghee and one teaspoon lime juice to water.

Add about 1/4 teaspoon of salt, or to taste.

Carefully add quinoa to hot water.

After some water has been absorbed, cover and cook quinoa on low heat.

Once the quinoa is soft cooked, remove from heat and fluff it with a fork so that it does not become lumpy.

In a wok or pan, heat the liquid ghee and add green chilly and cumin seeds.

Add cubed potato bits and saute to coat potato with ghee.

Add roasted sunflower kernels and quinoa.

Mix gently and thoroughly on low heat.

Add more salt if required and also 1 teaspoon of sugar. If you prefer more sugar, add a little more.

Cover wok/pan for 3 minutes or so, then turn off heat

Spoon into a serving bowl and garnish with fresh, finely cut cilantro leaves and shredded fresh coconut.

Really yummy and satisfying.


Read Full Post »

Moong Dal Vadas

Many people I know are allergic to chana dal (chick pea flour). One really doesn’t lose out that much.  Try these yummy moong dal vadas…they are as tasty, crunchier and lighter than the chana dal ones.  Once you have made these, you will want to make them again and again, whether allergic to chana dal or not.


moong dal vada


Ingredients

1 cup moong dal

1 cup lightly packed grated zucchini or finely chopped cabbage

1/3 cup finely chopped onion

2 Tablespoons or more chopped fresh cilantro (coriander)

Finely chopped green chillies to taste

1 teaspoon whole cumin seed

1 level teaspoon cumin seed (jeera) powder

1 teaspoon grated ginger (optional)

Pinch turmeric powder

Salt to taste 1/3 teaspoon baking soda.

Oil for frying


Method

Wash and soak Moong dal for 3-4 hours, then drain the water.

Take care to drain all the water and keep dal as dry as possible.

Grind coarsely, so that dal particles and small pieces remain.

Mix all other ingredients into it.

In case dal is too moist, add a couple of teaspoons of rice or oat flour.  The mixture should be firm, not runny.

Heat oil.  Put in a small ball of dal mixture to ensure readiness. 

Shape mixture into balls, slightly flatten each ball and gently put into the oil.

Fry on medium-high heat till golden brown, turning each ball over so that both sides are a deep golden colour.

Remove vadas onto a platter or thali.

Serve hot with tomato ketchup or chutney.

These vadas taste good even when cooled and are ideal for carrying on a journey.

Read Full Post »


No Indian festival feast is complete without a plateful –:thaali” of pedhas.  Of course pedhas are wheat and gluten free, but most store bought pedhas are heavily garnished with nuts.  When they are made without nuts, there is still a very high risk of cross contamination as nuts are such an integral part of Indian sweets– ‘mitthai’ makers facilities process nuts all the time.

For anyone with allergies, home made pedhas are the safest.  This simple recipe is so easy to make and so delicious!

These pedhas are ‘modak’ shaped,  specially created for the on going Ganesh Chaturthi festival.


Pedhas


Ingredients

3 cups milk powder 

1 stick or 1/2 cup of white unsalted butter

1 cup cream

3/4 cup sugar

1/4 teaspoon ground cardamom seed

1/4 teaspoon saffron threads (optional)


Method

In a small saucepan, lightly roast the saffron threads.  Alternately warm saffron in microwave for about 20 seconds or till threads become a little brittle.

Crush brittle saffron threads between fingers and place in a small bowl.  Add 2 teaspoons of hot water to crushed saffron.  Set aside.  After a while, color, flavor and aroma will get deeply enriched.

Place butter in non stick wok or large non stick pan, on medium heat  The process of stirring is easier in non stick equipment.

When butter has just melted, pour cream and give a stir.

Lower heat.

Mix in sugar, then gradually add the dry milk powder, stirring constantly.

Stir in milk powder well, making sure that there are no lumps

Stir well on medium low heat for about 10 minutes.  Stirring time depends largely on quality of milk powder.  Some brands of milk powder thicken faster than others.

Add cardamom powder and saffron- water mixture.  Stir till well mixed.

The mixture should not be so thick that it leaves the sides of the pan.  It should be soft and should be the consistency of thick cake batter or very soft dough.

Remove from heat and set aside to cool.

When cool enough to handle, but not really cold,  shape into round slightly flattened pedhas, or place into modak molds.

Finger-licking delicious!

Read Full Post »

What can be better than this fantastic combination of taste and nutrition.  We have protein rich quinoa along with the easy-to-digest, vitamin, mineral and protein providing moog dal.  Then there is the great comfort food, rice, which adds bulk and gives satisfaction.  I add a good amount of veggies, whatever I have at home, to create balance and enrich the meal with additional vitamins, antioxidants and good fiber.

This dish is a complete, balanced meal, and is so easy to make.

Quinoa Khichadi

Ingredients

1/2 cup quinoa grain

1/2 cup yellow moog dal

1/2 cup basmati rice

2 cups or more finely chopped vegetables of your choice (carrots, cauliflower, peas, peppers etc.)

1 large onion thinly sliced

2 teaspoons ginger-garlic paste ground with 1 jalapeno pepper (green chilly) or to taste, and half a cup of fresh cilantro (coriander) leaves

3 cloves

2 small sticks of cinnamon

1 teaspoon garam masala (optional)

1/2 teaspoon turmeric powder,

3 Tablespoons oil

1 Tablespoon pure ghee (clarified butter)

Salt to taste

2 Tablespoons finely chopped fresh cilantro (coriander leaves)  and 2 Tablespoons shredded coconut for garnish

3 cups hot water

2 teaspoons lime juice (optional)

Note:  I make my own garam masala to avoid cross contamination with any allergenic ingredients.

Method

Wash rice and moog dal together, drain and set aside

Wash quinoa using a sieve, rinse well three times and set aside

Heat oil in a large, heavy bottomed saucepan and add cloves and cinnamon sticks.

Add sliced onions, and saute till onions are soft and translucent

While onions are cooking, put up 3 and 3/4 cup water in a smaller pan, to heat and almost boil

Gently add washed and drained grains and moog dal to the softened onions, stir them in and saute for 2 minutes

Add the ginger-garlic-cilantro-jalapeno (green chilli) paste, saute for a minute more

Stir in vegetables, saute a little and add turmeric powder

Pour in the measured hot water

Add garam masala (optional) and ghee as well as the lime juice

When the water starts boiling, lower heat.

If the saucepan is large enough, you will be able to cover and cook on low heat without any water spill over

Cook for about 15 minutes or till the grains and moog dal are soft cooked

Turn off heat

Let the pilaf/ khichadi rest for a few minutes before transferring into casserole or serving dish.

Garnish with shredded coconut and cilantro leaves.

Serve hot with cut onions, tomatoes / yogurt based raita.

Delicious!

Read Full Post »

These colorful puris are excellent take-alongs.  Make the dough the previous day and refrigerate it.  Pull it out about 15 minutes before you plan to make the puris.  They are quick, easy to make and great tasting.  Pack them for a school lunch or carry on a journey.

You might even find yourself rolling out a much larger quantity for the whole family.

Puris

Ingredients

(Makes 10 – 12 puris)

1 cup Grandma’s Gluten Free Flour Mix ( just click here, or see recipe in Basics or Cakes Cookies and Desserts section)

1/2 cup carrots finely shredded, or very finely chopped in food processor

2 Tablespoons finely chopped fresh coriander (cilantro) leaves

Finely chopped green chillies to taste

1 teaspoon whole jeera

1 teaspoon oil

Pinch of salt, or to taste

1/3 cup water

1 Tablespoon or a little more rice flour for dusting

Oil for deep frying

Method

Mix all ingredients, except for water, in a bowl

Add water slowly as you knead, making sure that the dough is not too soft.  You may need to adjust the quantity of water.

Knead the dough well.  Smear a little oil on your hands to smoothen the dough as you knead.

Good kneading will ensure smooth puris with no jagged edges.

Divide dough into 10 balls or more if you want smaller puris.

Place rice flour on a plate nearby.

Take one ball, flatten slightly with your palms, then dust it lightly with rice flour

Place it on rolling surface, and using a rolling pin, roll into a small circle, a little thicker than chapati.

Roll out each ball separately and place rolled out puris on a plate/ baking sheet/ parchment paper

It is not necessary to use plastic wrap for rolling out puris, the way I recommend for chapatis / rotis.

Before beginning to roll out puris, place wok containing oil for frying on medium-high heat.

Oil will heat as you roll out the puris.

Test oil for readiness by dropping a small portion of dough into it.  The dough should sizzle and rise to the surface.

Remove fried dough.

Pick up a puri and gently slide it into the hot oil

Move the slotted frying spoon along the edges, to cover puri with oil, and press puri slightly.

Puri will slowly balloon a little

Flip puri onto the reverse side.

Fry for a few seconds till both sides are cooked and are golden brown in color.

Remove from wok, holding it with slotted spoon along the edge of the wok to drain oil.

Place on paper towel for excess oil to get absorbed.

After all puris are done, place on serving platter.

Note

These puris will not balloon as much as plain puris,, because of the heaviness of the dough.

Plain puris made with Grandma’s Gluten Free flour balloon as beautifully as wheat puris—try!

Savory Puris do not necessarily need a vegetable accompaniment.  You could try these with a favorite chutney or raita.  They are great just by themselves too!

Read Full Post »

Almost all Indian sweets contain a variety of nuts.  Even ostensibly nut free mithai such as milk cakes or pedhas are made in parallel with other, nut rich preparations.  The risk of cross contamination must be factored in.

It is so much safer to make special occasion mithai at home.  You need just about 15 minutes to make this yummy kalakand for all the family—and it is all the more delicious as it is so much more fresh than anything that has been on store shelves.


DSC02887[1]


Ingredients

  • 1 cup grated or crumbled paneer
  • 3/4 cup condensed milk
  • 1/4 cup dry milk powder
  • 1 teaspoon ghee
  • 1/4 teaspoon cardamom powder
  • A few strands of saffron (optional)
  • A few pumpkin seeds (kernels), sliced thin
  • A drop of green food color.

Method

  1. If you are using saffron, crush strands in a small bowl and add a teaspoon of hot water, to strengthen color. Set aside.
  2. Combine paneer, condensed milk, ghee and dry milk powder in a non stick saucepan or wok
  3. Place on low heat.
  4. Cook till mixture thickens into a lump.
  5. Add cardamom powder and saffron.
  6. Remove pan /wok from heat and spoon the cooked mixture into a plate, about 6” in diameter.  Flatten mixture with a spatula or with the back of a large spoon.
  7. Thinly slice pumpkin seeds and color them with the drop of green food color.
  8. Press colored pumpkin seeds randomly onto the flattened kalakand
  9. Allow the kalakand to cool, then make square pieces.  Gently lift pieces onto your serving platter, or place in a container and refrigerate for later use.

Suggestion

Use colored pumpkin seeds when not using saffron, or just make it colorful if you like.

Read Full Post »

Diwali is here! This traditional favorite is quick and easy to make, and  can be enjoyed by all.  These delicious gulabjamuns are gluten free, and when they taste just as good, why even make the conventional wheat containing ones?

(approx. 18 jamuns)

DSC02689

Ingredients

1 cup instant non fat dry milk powder

2 Tablespoons cornstarch (‘corn flour’ for Indian readers)

2 Tablespoons thick yogurt, plus 1 Tablespoon in reserve if needed

2 teaspoons ghee

1/4 teaspoon baking soda

Oil for deep frying.

Syrup

1 cup sugar

2 cups water

1/4 teaspoon ground cardamom seed (elaichi)


Method

Combine all dry ingredients in a medium bowl

Add one and a half teaspoon ghee, leaving half teaspoon for later use.

Mix half of the yogurt and add the remaining as needed, to make a medium-soft dough.  You may require the extra amount, depending on the texture of the milk powder.

Knead well so that the dough is very smooth..  Smear a little ghee on your hands as you knead, to prevent the dough from sticking to your hands.

Rub just a little extra ghee as you form small balls (about 18), with the dough.

Cover balls with a clean damp cloth or moistened paper towel.

Heat oil in a medium size wok, and allow oil to heat well, keeping flame on low..

Drop a small bit of dough into the oil to test readiness.  The dough should rise to the surface and fluff up a little.

Fry jamuns on low heat, a few at a time, till they are a rich, golden color.

Remove from oil, holding the balls with a slotted spoon against the side of the wok, so that most of the oil will drain.

Place on a dish lined with paper towels.

To prepare the syrup, combine sugar and water and place on medium high heat.

Allow the syrup mixture to come to a rolling boil and continue to let it boil for 4-5 minutes

Remove from heat and add elaichi powder.

Gently drop the fried balls into the hot syrup and set aside.

In about an hour or so, they will partly absorb the syrup and fluff into larger, spongy balls.

Warm the gulab jamuns a little before serving, or enjoy them at room temperature—either way they taste great! 

Read Full Post »

I have had many requests for Indian recipes.  While many Indian foods are gluten and allergy free, there are many others which have to be excluded from the gluten free diet. For anyone allergic to gluten, the chapati / paratha / puri is by far the most missed item in an Indian meal.

The chapati is also great substitute for the Mexican tortilla especially if corn is an allergy issue. Just substitute tapioca or potato starch for corn starch in my Gluten Free flour Mix recipe, which is right below the Start Here, at the beginning of my blog.  You will also find it in the Basics, or Cakes. Cookies and Desserts section.

Try the gluten free chapati / tortilla and see how soft and pliable chapatis remain long after they are made.  Serve them hot off the tava (skillet), or store them in an insulated container for later use, or even freeze them, then microwave and serve.  They are perfect to take along on a journey, rolled up with a favorite filling– anything from small pieces of chicken or paneer tikkas, aloo subzi, to sweet fillings like ghee and jaggery paste or strawberry jam can go in the chapati roll.  They are simply great for  school lunch as well.

Call them tortillas and make quesadillas with Mexican fillings, or prepare enchiladas with them. Fold them like wraps with salad/ cold meats, leftover cooked meats.  Or make quick and easy roll ups for hungry kids in a hurry.


DSC02684

Ingredients                                                            Makes 10-12

  • 2 cups Grandma’s Gluten Free Flour Mix 
  • 1/2 cup boiled and mashed potato
  • 1 Tablespoon plus one teaspoon oil (divided use)
  • 1 cup warm water (approximately)
  • 1 heaped tablespoon rice flour, mixed with a Tablespoon of corn starch for dusting
  • 1 Tablespoons or a little more, of oil or ghee for smearing on the pan or on the chapati./ tortilla.

Method – To Prepare the Dough

  1. Place flour mix in a large bowl, with mashed potato and 1 Tablespoon oil.
  2. Rub the potato and oil into the flour to incorporate well.
  3. Add half the water and start to knead the dough.
  4. Slowly add the remaining water (as needed), kneading all the time.
  5. Note:  Gluten free flours usually require more kneading than wheat flour to acquire a soft, smooth texture.
  6. Add a little more water if required.
  7. When you are able to form the dough into a ball, smear your hand with a little oil and continue to knead to make a smooth dough.
  8. Place prepared dough in a bowl, cover and allow it to rest for about 15 minutes.

Method – To Prepare the Chapatis / Tortillas

  1. Place the rice flour and corn starch mixture onto a plate and keep it at hand.
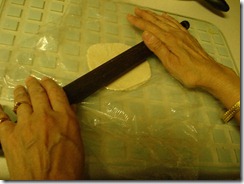
  2. Tear off two large sheets of plastic wrap, about 10” long  Place one sheet on rolling surface and the other on any clean, dry surface nearby.  Take care to ensure that plastic sheets are not close to stove top.
  3. Heat a tawa / skillet on medium- high heat, till well heated.
  4. Divide dough into 10- 12 equal sized balls.
  5. Roll each ball smoothly with your hands, press and flatten to form a disc.
  6. Take one flattened ball and dust it lightly with the flour mix kept on plate.
  7. Place on top of plastic sheet kept on rolling surface.
  8. Place the second plastic sheet on top of the ball, in parallel with the bottom sheet.
  9. DSC02685
  10. Roll out gently, rolling evenly on all sides, to form a fairly thin circle of dough about 7” in diameter. DSC02686
  11. Once rolled out, remove upper plastic sheet and set aside away from stove top.
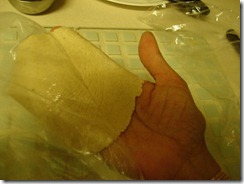
  12. Flip the chapati / tortilla along with the lower plastic sheet onto the palm of your hand.
  13. DSC02687 
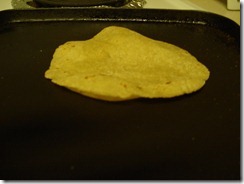
  14. With the other hand, peel off the plastic sheet, and place chapati / tortilla on tawa / skillet  
  15. Allow some bubbles to appear, then, using a spatula, flip roti onto the other side and allow it to cook while pressing it gently and moving it around the tawa / skillet a little.
  16. Flip once again and let the first side cook a little more.
  17. Remove from skillet, smear with ghee and serve hot, or keep in insulated container till all chapatis are are made, and then serve. 

DSC02688

Chef’s Tips 

Make Gluten Free Flour parathas just as you would make wheat parathas.  Make a hollow in the ball of dough,place your filling, then lift up all sides and close them so that filling is firmly enclosed within.

Gently press the filled ball, dust with dry flour mix, place on plastic wrap and roll out without pressing too hard with the rolling pin.

Puris can be made without adding the boiled and mashed potato.  Since puris don’t have to be large or thin, you may be able to make them without using the plastic wrap.

Enjoy!

Variation

My friend, Manisha, came up with a great idea–

Instead of mashed potato, use 3 Tablespoons of soft cooked dal for one cup of Gluten Free flour  I use moong dal, but you could try any other dal of your choice.  Dal should be of cake batter consistency.  You may need an extra Tablespoon if the consistency is too thin.

Add dal to flour, mix it in, then add water as required.  The amount of water you need depends on the consistency of dal, so add water a little at at a time.

Chef’s Tip

Cook 1/2 cup dal with a 1//4 teaspoon of turmeric and salt to taste.  Hing (asafoetida) is optional.  Fill it into ice cube trays, and freeze.  Remove frozen dal cubes from trays, put into in freezer bags, and place in freezer.  This way, you will have cooked dal handy before preparing the chapati / tortilla dough. 

Read Full Post »