Feeds:
Posts
Comments

Archive for October, 2012

Yogurt is the best probiotic that we can include in our daily diet.  When derived from active cultures, yogurt maintains and improves the balance of different kinds of bacteria in the intestines.  Apart from improving overall digestion, these friendly bacteria help to synthesize  some of the B group vitamins and Vitamin K.

Antibiotics and painkillers can destroy friendly bacteria, and it is especially important to repopulate the gut flora with these, by ingesting plenty of yogurt.  Lactobacillus is the most important component of friendly bacteria.

Yogurt converts lactose (milk sugar) into lactic acid, thus making digestion easier.  Lactose intolerant people can usually have yogurt without any problem.  Well known nutritionist Marion Nestle recommends trying hard cheese and yogurt, as “the friendly bacteria used to making these foods have already digested most of the lactose they contain.  However, caution is the key word here.

Studies tell us that not only are the proteins in yogurt more easily digestible, but also its micro components such as calcium and phosphorus are more widely and immediately available to our bodies.  Research shows that our bodies absorb twice the amount of calcium from yogurt than from milk.

Studies also show that–

-yogurt helps to stop dysentery caused by bacteria and unbalanced diets,

-plays a role in the suppression of cancer cells,

-regenerates intestinal flora upset by medication,

-helps in healing skin infection and eczema

-soothes chronic constipation,

-boosts the immune system.

The “Complete Food and Nutrition Guide” brought out by the American Dietetics Association (ADA), states that yogurt is one food that is a must for children, the elderly and for people recovering from illnesses. and that it can even prevent allergy symptoms.

Some yogurt facts written in the ADA Guide–

Regular yogurt supplies considerably more calcium than frozen yogurt.

No federal standards exist for frozen yogurt.

Very low temperatures in frozen yogurt slow down the action of any live cultures.

It is best to have yogurt as a snack rather than at the end of a meal.

Never leave fresh fruit in yogurt  for longer than half an hour.  Add cooked fruit to yogurt if you wish to make fruit yogurt.


Did You Know

That Ancient Egyptians preserved milk in containers made from animal skins, while in Mesopotamia milk containers were made out of dried gourds.  In India, the earthen pot is considered as the best to use for yogurt.

That yogurt is made everyday at home in many cultures.  In India people make yogurt by adding a small quantity of the previous day’s yogurt to warm milk, and keeping it in a warmer corner of the kitchen for about 4 hours, till it is set and ready to eat.  Yogurt culture can now be bought in stores, but where and how the first few spoons of yogurt were obtained centuries ago is a story that is lost in the mists of history.

That when bought from stores, we need to ensure that yogurt is made from live cultures certified by the National Yogurt Association.

Read Full Post »

I have had many requests for Indian recipes.  While many Indian foods are gluten and allergy free, there are many others which have to be excluded from the gluten free diet. For anyone allergic to gluten, the chapati / paratha / puri is by far the most missed item in an Indian meal.

The chapati is also great substitute for the Mexican tortilla especially if corn is an allergy issue. Just substitute tapioca or potato starch for corn starch in my Gluten Free flour Mix recipe, which is right below the Start Here, at the beginning of my blog.  You will also find it in the Basics, or Cakes. Cookies and Desserts section.

Try the gluten free chapati / tortilla and see how soft and pliable chapatis remain long after they are made.  Serve them hot off the tava (skillet), or store them in an insulated container for later use, or even freeze them, then microwave and serve.  They are perfect to take along on a journey, rolled up with a favorite filling– anything from small pieces of chicken or paneer tikkas, aloo subzi, to sweet fillings like ghee and jaggery paste or strawberry jam can go in the chapati roll.  They are simply great for  school lunch as well.

Call them tortillas and make quesadillas with Mexican fillings, or prepare enchiladas with them. Fold them like wraps with salad/ cold meats, leftover cooked meats.  Or make quick and easy roll ups for hungry kids in a hurry.


DSC02684

Ingredients                                                            Makes 10-12

  • 2 cups Grandma’s Gluten Free Flour Mix 
  • 1/2 cup boiled and mashed potato
  • 1 Tablespoon plus one teaspoon oil (divided use)
  • 1 cup warm water (approximately)
  • 1 heaped tablespoon rice flour, mixed with a Tablespoon of corn starch for dusting
  • 1 Tablespoons or a little more, of oil or ghee for smearing on the pan or on the chapati./ tortilla.

Method – To Prepare the Dough

  1. Place flour mix in a large bowl, with mashed potato and 1 Tablespoon oil.
  2. Rub the potato and oil into the flour to incorporate well.
  3. Add half the water and start to knead the dough.
  4. Slowly add the remaining water (as needed), kneading all the time.
  5. Note:  Gluten free flours usually require more kneading than wheat flour to acquire a soft, smooth texture.
  6. Add a little more water if required.
  7. When you are able to form the dough into a ball, smear your hand with a little oil and continue to knead to make a smooth dough.
  8. Place prepared dough in a bowl, cover and allow it to rest for about 15 minutes.

Method – To Prepare the Chapatis / Tortillas

  1. Place the rice flour and corn starch mixture onto a plate and keep it at hand.
  2. Tear off two large sheets of plastic wrap, about 10” long  Place one sheet on rolling surface and the other on any clean, dry surface nearby.  Take care to ensure that plastic sheets are not close to stove top.
  3. Heat a tawa / skillet on medium- high heat, till well heated.
  4. Divide dough into 10- 12 equal sized balls.
  5. Roll each ball smoothly with your hands, press and flatten to form a disc.
  6. Take one flattened ball and dust it lightly with the flour mix kept on plate.
  7. Place on top of plastic sheet kept on rolling surface.
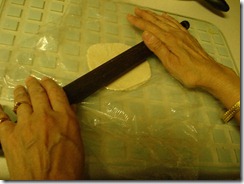
  8. Place the second plastic sheet on top of the ball, in parallel with the bottom sheet.
  9. DSC02685
  10. Roll out gently, rolling evenly on all sides, to form a fairly thin circle of dough about 7” in diameter. DSC02686
  11. Once rolled out, remove upper plastic sheet and set aside away from stove top.
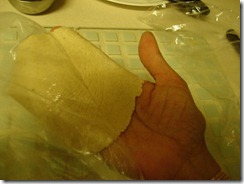
  12. Flip the chapati / tortilla along with the lower plastic sheet onto the palm of your hand.
  13. DSC02687 
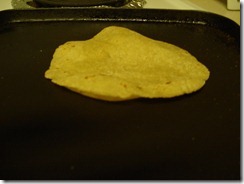
  14. With the other hand, peel off the plastic sheet, and place chapati / tortilla on tawa / skillet  
  15. Allow some bubbles to appear, then, using a spatula, flip roti onto the other side and allow it to cook while pressing it gently and moving it around the tawa / skillet a little.
  16. Flip once again and let the first side cook a little more.
  17. Remove from skillet, smear with ghee and serve hot, or keep in insulated container till all chapatis are are made, and then serve. 

DSC02688

Chef’s Tips 

Make Gluten Free Flour parathas just as you would make wheat parathas.  Make a hollow in the ball of dough,place your filling, then lift up all sides and close them so that filling is firmly enclosed within.

Gently press the filled ball, dust with dry flour mix, place on plastic wrap and roll out without pressing too hard with the rolling pin.

Puris can be made without adding the boiled and mashed potato.  Since puris don’t have to be large or thin, you may be able to make them without using the plastic wrap.

Enjoy!

Variation

My friend, Manisha, came up with a great idea–

Instead of mashed potato, use 3 Tablespoons of soft cooked dal for one cup of Gluten Free flour  I use moong dal, but you could try any other dal of your choice.  Dal should be of cake batter consistency.  You may need an extra Tablespoon if the consistency is too thin.

Add dal to flour, mix it in, then add water as required.  The amount of water you need depends on the consistency of dal, so add water a little at at a time.

Chef’s Tip

Cook 1/2 cup dal with a 1//4 teaspoon of turmeric and salt to taste.  Hing (asafoetida) is optional.  Fill it into ice cube trays, and freeze.  Remove frozen dal cubes from trays, put into in freezer bags, and place in freezer.  This way, you will have cooked dal handy before preparing the chapati / tortilla dough. 

Read Full Post »